Customization Overview
To understand how to customize the default setup, it is important to first understand how the quick recovery process works. This install uses a storage scheme called UnionFS, which looks like this:

Logically, the storage on the system is divided into two slices: the system software and settings on the left, and the user's files on the right (commonly referred to as the user's "home"). Physically, however, the storage is actually divided into three slices. The two that are part of the UnionFS setup are the left, labeled "User Changes" and "Default System". What UnionFS allows us to do is create a single logical storage space by combining two physical partitions, one of which is read only ("Default System" above) and one which is read/write ("User Changes" above). Any time the user makes any changes, they are all written to the "User Changes" space. No changes are ever made to the "Default System" space. So, when we want to restore the system to its default settings, we simply erase the "User Changes" space (using the process described in Basics, and all is back to normal. The beauty of this is two-fold: the system can be restored to default settings in a matter of seconds, and the action is relatively non-destructive, as none of the user's documents in "User Home" are touched.
It is important to note that there are a number of application specific settings that are stored in the user's home folder. Therefore, if we want our restore to work well we also need to restore these settings when we do a factory restore. To facilitate this, default user settings are stored on the "Default System" space in a directory called "/home", and automatically copied into the user's home folder when a factory restore is performed (regardless of the option selected). This is relatively non-destructive, as any files added by the user will not be lost. Some end user settings may be overwritten, however.
In summary, the restore process performs the following steps:
- Formats the "User Changes" partition, erasing any OS related changes.
- Copies all the files from within "Default System"/home to the "User Home" space
There are two ways to customize the installation for your environment. If you plan to simply change some settings and add a few applications, then Simple Updates is the way to go. If you plan to make more drastic changes, such as removing applications, then Rebuilding the Base Image is where you will want to go.
Important Note: The "Default System" space above defaults to 12 gigabytes in size, with roughly 1.5 Gigabytes of free space. You can increase and/or decrease this amount by doing an advanced install, although the system requires a minimum of 10 Gigabytes of storage space on the primary disk. While most devices can handle this, some older netbooks have very small solid state disks, which will not be large enough to accommodate the system. Also, bear in mind that you don't need to allocate a huge amount of space to the Default System - you can always increase the size of the Default System space on an installed system after the fact by following the instructions below under "Resizing the Base System Partition" below.
Simple Updates
The Simple Update method is quick and very easy to implement, as it simply copies all necessary files from the "User Changes" and "User Home" spaces (see image above) into two files on the Ubermix key, called "mods.tar.gz" and "user.tar.gz". It is an ideal solution for handling minor modifications to a default system setup, such as setting up printers, installing a few additional applications, adding some files to the user's home folder, and making modifications to the user interface. The beauty of this approach is that, once created, these files can be copied to other ubermix install keys to create a specialized setup for a small number of machines (like a lab) without modifying the default configuration that is the basis for all of your devices. Since the files are generally small, the whole process can be completed quickly and easily.
Please Note: This process is NOT for making significant changes to the default system, such as adding more than a few small applications, or removing applications. If you plan to delete programs or add significant amounts of data, you should not use this method. Follow the steps under "Rebuilding the Base Image" beneath this section for details on how to make significant modifications to the ubermix install.
Step-by-Step
The process for creating simple updates is, well, simple. Follow the steps below to create your own simple update files:
- Restore your device to factory settings by following the instruction in Basics. Be sure to choose option 2, "Restore unit completely" - it is important that we start the process with a blank slate.
- Make all the changes you wish to make. For example, you can use "Main Menu" under "System" (alacarte from the command line) to change the icons and categories that appear in the launcher. Or use "Ubuntu Software Center" or "Synaptic Package Maneger" under "System" ("sudo software-center" or "sudo synaptic" from the command line) to add a few new applications (remember - DO NOT remove any applications when creating simple updates files). Keep in mind that you only have about 300Mb of free space on the Default System space, so don't over do it.
- Run any new applications to make sure that they work, and make appropriate changes to their preferences as needed.
- Insert your ubermix-install key and reboot your system, booting from the key in the same fashion as you did when you originally installed the system (see Download & Install for details.)
- When the menu appears, select option "5. Expert Options"
- From the next menu, select option "2. Create simple updates files using this machine as a model"
That's it! Reboot your machine normally, and you will find updated "mods.tar.gz" and "user.tar.gz" files on your ubermix key.
Extremely Important: Wait for your machine to reboot completely and eject the ubermix install key properly before removing it, or you will be left with a corrupted install key.
Rebuilding the Base Image
Rebuilding the base image is not difficult, but is a bit more time consuming. Choose this option if you will be deleting applications from the default install, or plan to make significant changes. For best results, you should always perform these steps on your smallest device. For example, if you have a flash-based devices with 16 Gigabytes of storage and hard disk based devices with plenty of free space, create the image on the flash-based device if you want to create one image for use with both machines.
It is important to keep in mind that the "Default System" space (see above) defaults to 12 Gb of space on your primary disk, with about 1.5 Gb free. If you believe that you will need more than 1.5 Gb of space to install everything you want, you should consider Resizing the Base System Partition first (instructions below). Keep in mind that devices with 16 Gigabytes or less of space on their primary disk will be too small to resize.
To rebuild the base image, we will boot the system with UnionFS turned off, make our changes, do a little prep work, and overwrite the image file on the key with our new image.
- Restore your device to factory settings by following the instruction in Basics . Be sure to choose option 2, "Restore unit completely" - it is important that we start the process with a blank slate.
- Reboot the computer and press ESC immediately after your computer manufacturer's splash screen disappears (you should see a flashing cursor in the top left corner for a few seconds - press the escape key within 3 seconds to view the menu.)
- Select "Normal Boot" from the menu (but don't press enter) and press the "e" key on your keyboard
- Select the line in the box that begins with the word "linux" and move the cursor to the end of the line. Add a space, followed by "aufs=off" (no quotation marks). Note: for ubermix 3.x and earlier, the instructions are slightly different. Instead of adding to the "linux" line, select the line in the box that begins with the word "initrd" and move the cursor to the end of the line. Backspace over the four letters "aufs" and replace them with "generic".
- Then press "ctrl+x" on your keyboard to boot
- The system will boot with the User Changes space disabled, allowing you to run directly from the (ordinarily locked) "Default System" space (see above). Make all the changes you wish to make. For example, you can use "Main Menu" under "System" (alacarte from the command line) to change the icons and categories that appear in the launcher. Or use "Ubuntu Software" or "Synaptic Package Maneger" ("sudo software-center" or "sudo synaptic" from the command line) to add or remove applications.
Once this is complete, we will need to do some prep work before creating the image. Do the following:
- Insert your ubermix-install key and reboot your system, booting from the key in the same fashion as you did when you originally installed the system (see Download & Install for details.)
- When the menu appears, select option "5. Expert Options"
- From the next menu, select option "1. Update the image on the key using this machine as a model". Note that this process takes a fair amount of time. Since most systems will turn off their displays after a brief period of inactivity, you may find that your screen goes black unexpectedly. If that happens, simply press a "shift" or "ctrl" key to wake the screen back up.
That's it! The image process will take some time, but once it is complete, the base image on the key will now match your custom settings.
Extremely Important: Wait for your machine to reboot completely and eject the ubermix install key properly before removing it, or you will be left with a corrupted install key.
Important note: Once you modify the base image, the simple update files on the key will probably be obsolete, so don't do simple updates without first updating those files as per the instructions above.
Resizing the Base System Partition
If you have a system with a large primary storage disk and require additional space in the "Default System" space (see above), you can now increase the size of that partition (hereafter referred to as the "Base System Partition") using your ubermix install key after a system has already been setup, should you find that you need more space. Keep in mind that if you plan to Rebuild the Base Image (see above) after resizing, you should try to keep the size of the Base System Partition as small as possible, as a large partition will require more space on your ubermix install key. A good rule of thumb for sizing is to make the Base System Partition no larger than twice the size of the ubermix install key, as it will otherwise not fit on the key. Also, a larger Base System Partition will take longer to create and longer to install, so don't make it unnecessarily large.
Important note: DO NOT attempt to resize the Base System Partition on a computer that does not have a large primary disk. For example, if your system has only a 16 Gigabyte flash disk, the process will fail due to lack of disk space and require you to reinstall the ubermix from scratch.
Warning: The resize process deletes the "User Home" space (see above) as part of the resize process. This means that any user data in that space will be lost. Be sure to back up anything you want to keep from the home folder prior to resizing the Base System Partition.
Resizing the base system partition is quite simple using the resize option on the ubermix install key:
- Insert your ubermix-install key and reboot your system, booting from the key in the same fashion as you did when you originally installed the system (see Download and Install for details.)
- When the menu appears, select option "5. Expert Options"
- From the next menu, select option "3. Resize the base system partition"
- Answer the prompts accordingly
This process requires only a few seconds to complete.
Resizing the Ubermix Key to Accommodate a Larger Base System Partition (Version 2.4+)
Once you have resized your Base System Partition (see above), Updating the Base Image (see above) will naturally become a problem, as the default ubermix key install only uses up 3Gb of a USB key, regardless of the size of the key. To accommodate a larger Base Image, you will first need to increase the available space on your ubermix key.
Please note: While there are a variety of methods that may be used to increase the size of the IMAGE partition on an ubermix key, the instructions below apply to using the default software on an ubermix system to increase available space. You could also install and use applications like gparted to achieve the same result, or even a Windows machine or a Macintosh for this, however steps will vary.
- Working from a computer with the ubermix already installed, insert your ubermix key into any usb port. You should see 2 partitions automatically mount - one called UBERMIX and one called IMAGE. The UBERMIX partition contains all of the installer files, while IMAGE contains the actual image file. It is important to leave the UBERMIX partition alone, as tampering with it will likely leave the USB key unbootable.
- If you wish to preserve the image that is already on the key, create a folder on your hard disk and copy all of the files off from IMAGE into that folder. If you will be updating this key from a device immediately after resizing, then you can skip this step.
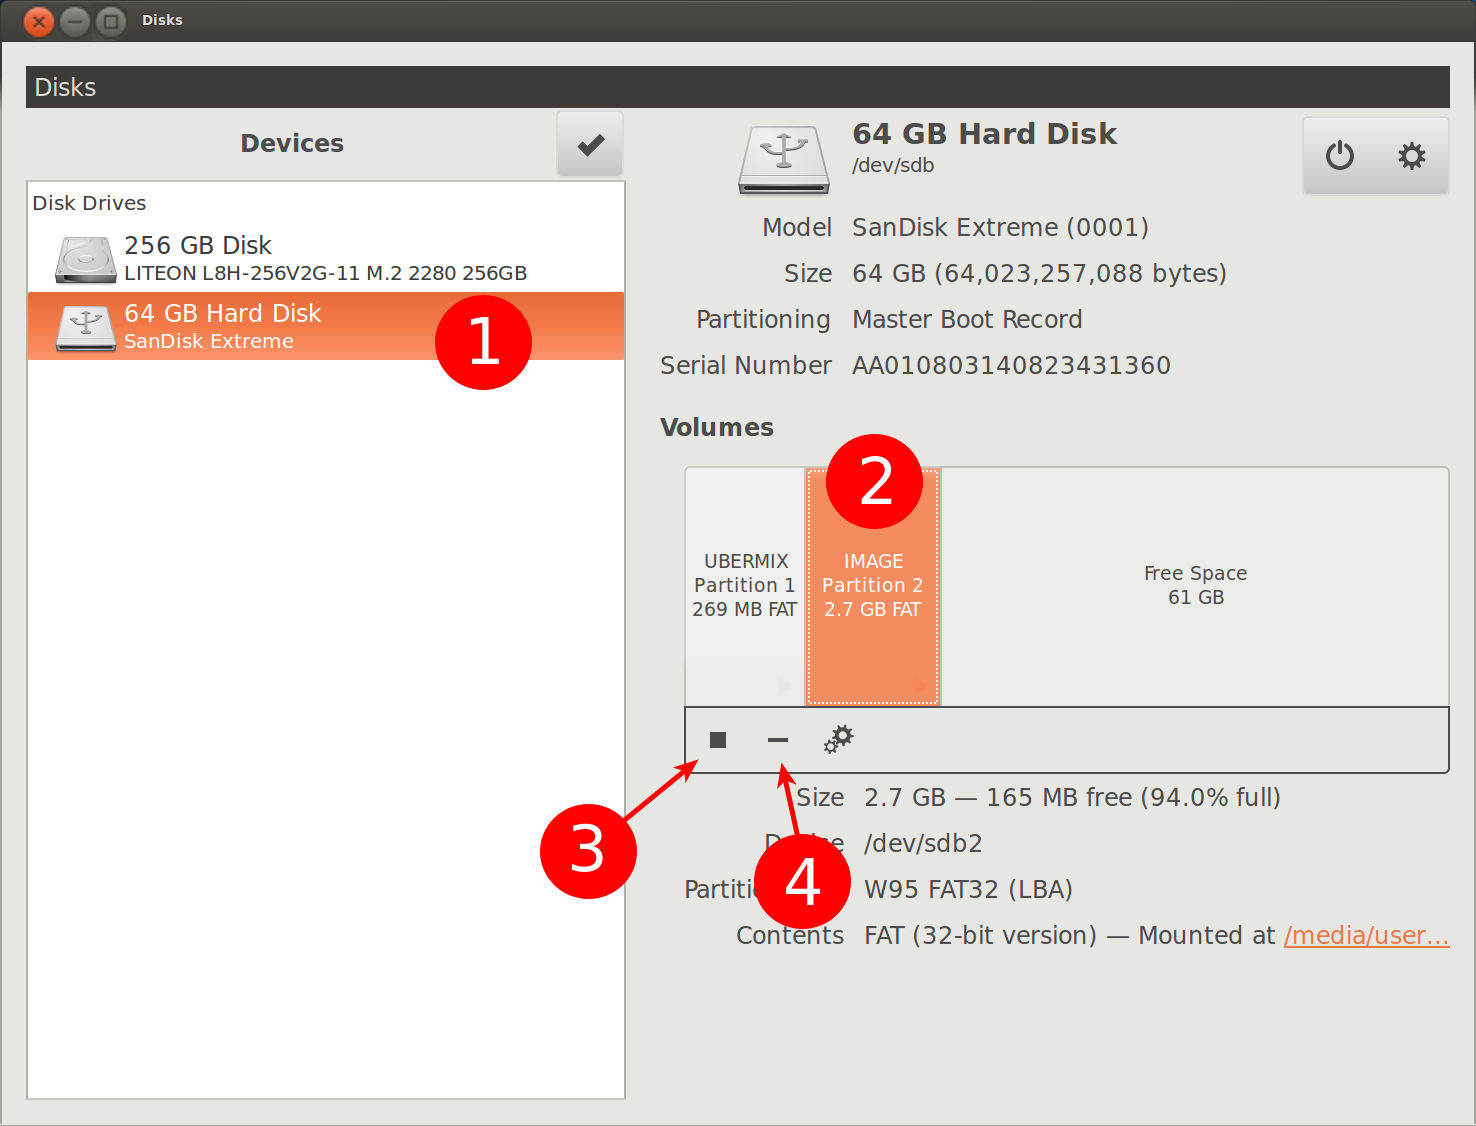
- Open "Disks" from Activities->Accessories, then
- Click on the USB drive in the left pane.
- Click in IMAGE under Volumes.
- Click on the square "stop" button to unmount it.
- Click on the "minus" button to delete it.
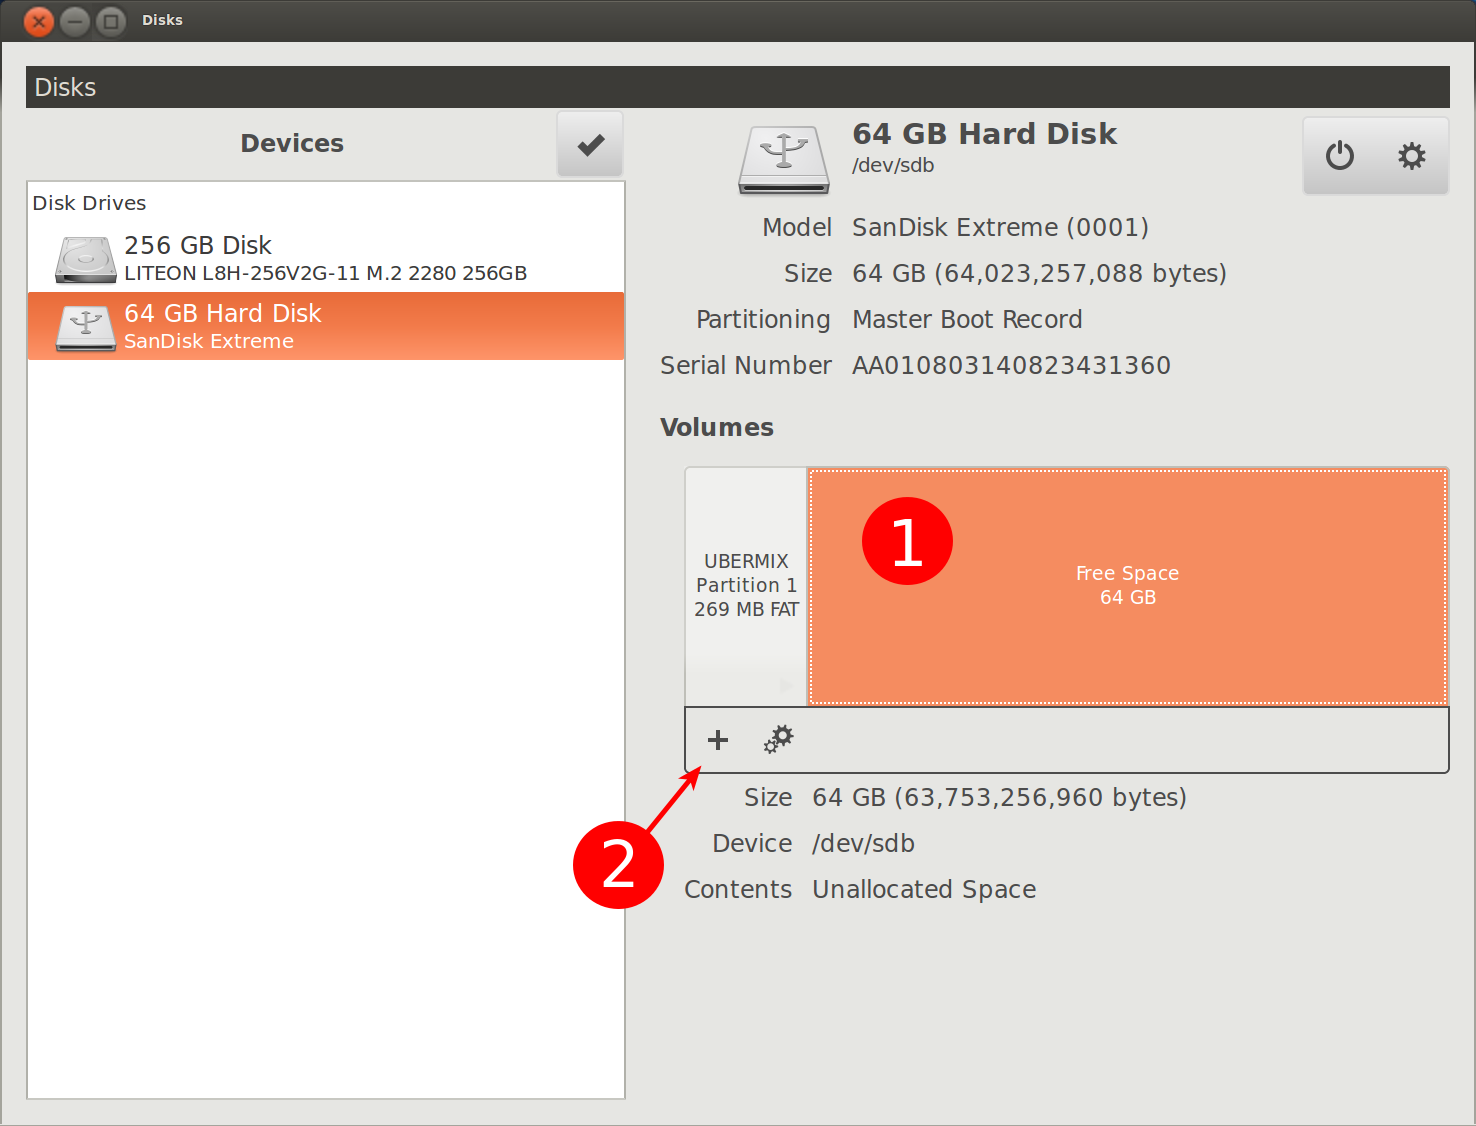
- Next, we'll create a bigger IMAGE partition on the USB drive. Follow these steps:
- Click on "Free space" under Volumes.
- Click on the "plus" button to add a new Partition.
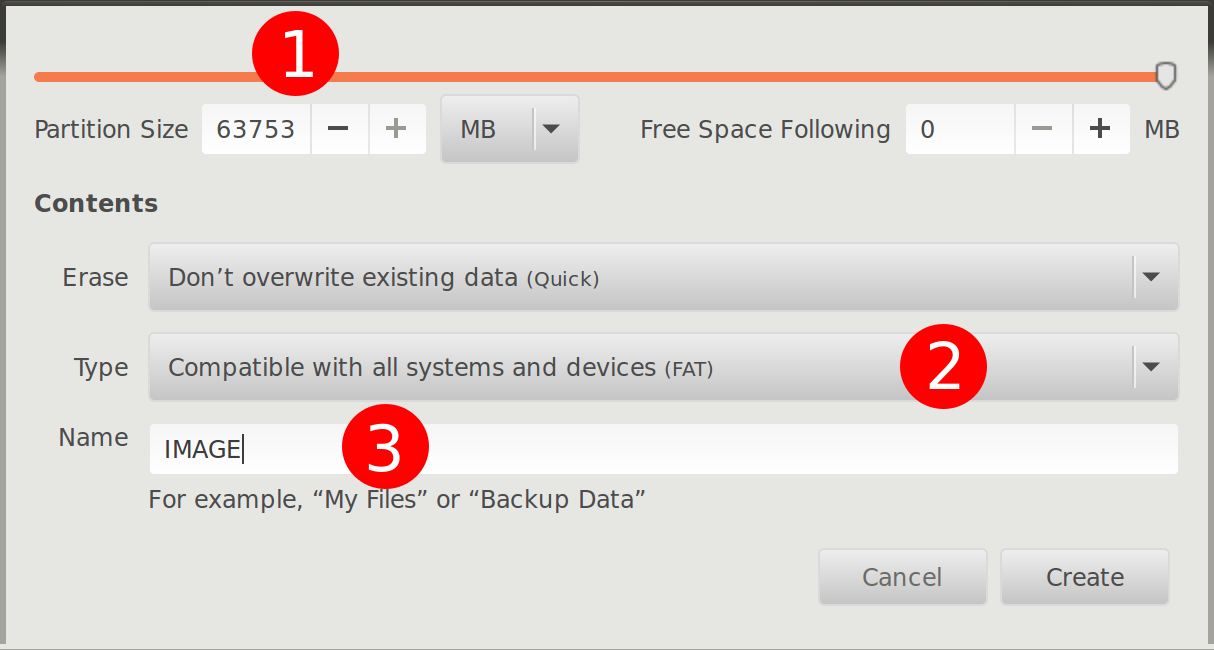
- When the Create Partition dialog appears:
- Set the size of the partition to the desired amount - the default will fill the rest of the USB drive.
- Choose "Compatible with all systems and devices (FAT)" from the Type menu.
- Set the name to "IMAGE" (all caps) and click the Create button.
- Close Disks and, if you copied image files in step 2 above, copy the files from the folder you created in step 2 back onto the newly resized IMAGE partition.
Once complete, your ubermix key will be resized and ready to accommodate a larger Base Image.