ubermix Basics
ubermix is designed to be a small and fast combination of the Ubuntu Linux operating system and popular open-source applications, wrapped in an easy-to-use interface that works well on nearly any screen shape or size.
For the most part, the interface should be relatively easy for anyone who has ever used a computer to get started with. Along the bottom is a dock with icons for favorite applications, with a "grid" button on the far right that opens a full list of applications. Once the application list is open, you can either scroll through the list of applications, or start typing the name or function of the application (movie, for example) to narrow the list.

settings
You may see additional icons task bar, depending on your hardware and currently running applications.
In the top left corner of the screen, you will see a "three dots" button that, when clicked, brings up the system overview (also called "Gnome Activities"). You may also bring the overview up quickly by pressing the Super (Windows) key. From the overviw, you can simply start typing to locate and run applications. The overview also displays open windows for any running applications, which you may click on to switch quickly to that application.
You will also find a list of available "workspaces" along the right edge. Open windows may be grouped on workspaces by simply dragging them to the desired workspace on the right. You may also switch between workspaces by simply clicking on a workspace in the overview. You can also switch workspaces up and down at any time by pressing the Super+PageUp or Super+PageDn (Super is usually the Windows key)

Additional details:
- Ctrl+alt+t opens a terminal window at any time
- You can switch between workspaces by pressing Super+PageUp or Super+PageDn.
- The default user account is called "user" and it is an administrator account with full access to machine settings, which allows for installation/configuration by the user without any password prompts. Should you be prompted for a password at any point, the default password is "password".
- "Screen lock" and all the hotkeys associated with it have been disabled
- Trackpad tapping is disabled by default. To re-enable, go to "System Settings" and click "Mouse and Touchpad"
- A number of keyboard shortcuts have been changed/disabled to prevent confusion and accidental selection. To adjust these settings, go to "System Settings" then click "Devices->Keyboard"
For further assistance with basic usage of the system, click on the "Help" icon.
How to use the quick recovery features
One of the key features of this custom build is the ability to quickly recover from problems and restore the system to a default state. This process is relatively non-destructive, as all of the user's files can be retained, should you so choose. To perform a quick restore, perform the following steps:
- If the machine is already off, press the power button to turn it on. If it is running, press the power button and choose "Restart" from the menu that appears.
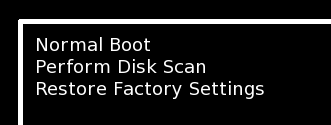
- Immediately after you see the system's splash screen the screen will go black and you will see a 3 second countdown timer - press ESC during those 3 seconds to enter the boot menu. Be prepared - you will only have 3 seconds to press the ESC key.
- When you see the following screen, choose "Restore Factory Settings"
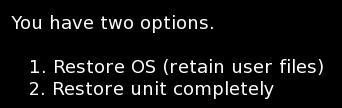
- After a few moments, you will see the following screen. Choose your option (usually will be "1")
- Follow any additional directions on the screen.
In a few seconds (literally) your device will be reset to a standard configuration.